The scene is set with a party of three gritty scavengers, one man (the undertaker), and two grubby women; one's an old laundress and the other the bold, brassy former housekeeper of the Late Mr. Ebenezer Scrooge. They are pawning the items they stole upon his recent death. The undertaker and the laundress, have already been speedily short-changed by Joe, the crafty and knowing pawn broker and it only awaits the house keeper's turn to show him what she has been excitedly saving in her stash ....
"Now open MY bundle, Joe!"
"Come on, what is it?"
"BED CURTAINS!"
"bed curtains??"
"Ah hah, BED CURTAINS!"
"But you.... you mean to say, that you took these down, rings and all, and with him, ... lyin there?!!! "
"Yes I do! Why Not!!?
"You were born to make a fortune ma'm, and you Certainly Will.....! ...
*****
Now you may just be wondering why I opened with that bit of dialogue from the movie, " Scrooge"( A Christmas Carol) written by Charles Dickens in 1843 and staring Alastair Sim in 1951,
( whom I consider to be the Very Best Mr. Scrooge- EVER!) Well, when I was thinking of a title for this post, I was going to just call it "How I made the curtains"....Then, one thing led to another and it was all finally condensed down to just 'Bed Curtains', and then
( don'tcha know) the movie sorta popped into my head ( because that is how my mind works). Now I shall show you how I got busy and got to work making them.
So without further ado, I present to you....

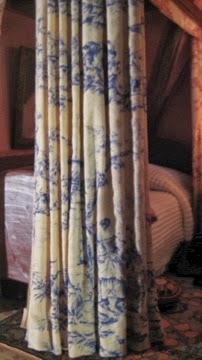
"BED CURTAINS"
 |
| This is the fabric I made the bed curtains from It is a 100% cotton quilting fabric that has a toile print. |
 |
| For these curtains I wanted to lightly stain the fabric so I wet it down with water |
 |
| I squeezed out the excess |
 |
| I put in a microwaveable dish with some old coffee |
 |
| I made sure that it was all coffeed up and cooked it for about a minute in the microwave |
 |
 |
| I rinsed it with clear water and squeezed it out again really well If it is not dark enough then you can repeat the process as many times as necessary until the desired amount of stain is achieved but make sure you have enough coffee in the dish to cover the wet fabric. |
 |
| I opened the fabric out and added gel glue! |

 |
| I have used this glue on other similar fabric projects and I love it because it is so easy to distribute throughout the wet fabric. I have not tried this with any other glue so I couldn't say how they would work, but this stuff is available almost everywhere and it is cheap and easy! |
 |
| I made another panel for this tutorial, so that I would have enough photos ( a la' Susan) so that is why this fabric is a different color. I used about a teaspoon of the gel glue but it would depend on the amount fabric that you were using. I mushed the glue all through the damp fabric so that it was evenly distributed. It is sticky but not gummy! If you think that you have too much then rinse it out and try again. |
 |
| Mix and mush and mix and mush... etc. ect. ect. |
 |
| Now smooth the fabric out face down and cut off the loose threads |
 |
| Fold up a hem. The fabric should fold and stick to itself easily but if it doesn't want to stay, then lightly apply a tiny bit of gel glue to the hem and smooth it out with your finger! and then finger press the hem to get a sharp crease. ( Good to have some wet wipes handy ) |
 |
| This is the damp, gluey cloth with the hem turned up, {note to self: } There is more water than glue in this fabric. What you see above is a damp wet cloth lightly saturated with glue. |

|
| Turn you fabric over to face up |
 |
| TOOLS OF THE TRADE *** This is a PRETTY PLEATER that I have had for nearly 20 years! Pleaters are made of a dense rubber and they make Very Rigid and UNnatural Pleats IF you use it the way that most people do. The package orginally came with a tiny plastic credit card-sized 'doom-a-hicky' but it is a waste of time to use as it is way too small for the length of most drapes. That is why you see the long plastic ruler but Anything Non Stick that you can hold and lift, and that is narrow enough to insert between the grooves, will do! It has to be long enough to hold down the entire length of the fabric that you will be pleating |
 |
| Make sure that your fabric is facing upward and lay evenly over the surface of the pleater. Now some of you may be use to pinning your pleats and I suppose that this wet cotton and glue solution could work for that too, but I am showing what I did to get the results that I photographed for my curtained bed, SO, do with this tutorial, what you will. :) *** Anyhoo, to continue.... I used the long plastic ruler to inset the first fold into the grooves of the pleater and I held it there and used the shorter metal ruler to push the second pleat in, by sliding the ruler down the length of the fabric till I got to the end. |
 |
| Close ups |
 |

 |
| Every time I moved the longer ruler over it is to hold the fabric in the grove while the smaller ruler slides into the groove beside it. Because the fabric is lightly saturated with the water and the gel glue, it cooperates and stays put. DO NOT USE EVERY SINGLE GROOVE FOR THE PLEATS! if you want them to look natural, then vary the spacings ie. a few narrow ones, wide then narrow, then go over for 2 etc. and mix it up! as you can see from the photo above. |

 |
| This is the curtain panel all done. You can see how the pleats are both wide and narrow in both the top photo and the one below. If the hem is crooked then STRAIGHTEN IT UP I used the small ruler to push the hem up on the fabric pictured below that is why it is wrinkled at the hem, make adjustments by manipulating until it looks the way that you want it to look when dry. What you see becomes what you will get. |

 |
| Next is the blow dryer's turn! I set it for 'HIGH' and hold the fabric down with the ruler |

 |
| BEFORE they are totally set and whilst still a bit damp, you will need to begin to manipulate the hem. To make them look like they are falling naturally, gently lift the bottom hem of the drape up and away from the rubber mat. It will give the hem a more natural look as it dries! |
 |
| I make slight adjustments as I apply the heat. Make sure that you have anchored the top of the curtain as you dry it or it could become a FLYING CARPET! Soften the folds from the bottom hem as they are setting up. The gel glue makes this easy and fun to do! |
 |
| These look pretty wrinkled but they are actually look perfectly fine once they are hung. Trust me on this. This fabric relaxed at bit once it was lifted off of the rubber pleater. |
 |
| To make the Bed Curtains Heavier, I just folded the ends in towards the middle and saw how much needed to be shaved off the ends to clean them up, removed any loose threads, to get the width that I required. |
 |
| Then I trimmed the pleats off to where I needed. If I wanted to make TWO PANELS, then I would trim the edge of the fabric as straight as I could with a fold turning inward. THEN I WOULD CUT THE FABIC PANEL INTO TWO EQUAL PARTS LEAVING ENOUGH WIDTH IN WHICH TO MAKE A long HEM for BOTH SIDES OF EACH LENGTH which you would secure with a tacky or fabric glue. (that was how I made the window curtains for the bedroom ) Trims could also be added to the inside edge but I wanted these plain so I didn't do that, instead I doubled the fabric over towards the centre and secured with a tacky glue to keep the folds in place. Tacky glue should be used sparingly The fabric is stiff but still pliable and soft in both appearance and to the touch. Very easy to work with! Below you can see an example of a narrow edge hem along the length of the drape or you can make a heavier drape by doubling the curtain up YOUR CHOICE |

 |
| The finished panel |
 |
| You see they do not look stiff or wrinkly at all! The drop of the drape looks very soft and real |
 |
| HOLD ON.. ..."Now open my bundle, Joe!' "Come on ,what's in it? "A SHOWER CURTAIN!" |
 |
| "A shower curtain???" Swweeeet! (to be continued) ***** |
elizabeth
.jpg)


Que bonitas quedan las cortinas. Gracias por el paso a paso. Besos
ReplyDeleteElizabeth, thank you for making this very clear Tutorials. Your curtains are so beautiful. I never thought, that I could cook my fabric in the microwave, eigther, that I could put glue on the fabric. So it is a very useful knowledge I have got today. One day, I have to try this. Thanks for taking your time, to make this useful tutorials.
ReplyDeleteYou are so clever, so smart, so maybe you know, how I get 5 more hours a day? smile.
A big hug
Wyrna
Hello Wyrna! This tutorial was for YOU! :D I hope that this explanation of how I made the drapery panels helps to answer your questions! I only cook the fabric if I want the stain to really penetrate quickly. It makes the fabric more receptive towards the dye.
DeleteAs to the glue; I used the gel because it is a WATER BASED ADHESIVE and not so rubbery or so thick that it would dry in splotches. Gel dissolves with water the best and so it stands to reason that it would result in the lightest finish. Hey! I am not so clever, just resourceful! Hah! However I still don't know how to stretch an hour. But I can sure tell you how to waste an entire sunny day indoors, just fiddling around with mini stuff! hahahhahha
elizabeth
Hi Elizabeth,
ReplyDeleteI always avoided a pretty pleater, because I thought it was too stiff looking, but you've managed to convince me that it should be on my Christmas list!
I normally use fabric starch for mine, as I can't get gel glue over here, but I find it quite expensive for what it is. Do you think a mix of ordinary pva and water might work, or would it be too shiney?
I love the shower curtain, what a good idea! And of course, the best Scrooge was Alistair Simms, just the right amount of Victorian Gothic creepiness!
Jonquil
Hello Jonquil! I'm with you! I used to avoid the Pretty Pleater too, in fact, I have owned this tool but have rarely used it just because whenever I did or saw how other peoples drapes looked, very stiff and soldier-like, it turned me off. But I decided that I had to teach myself how to make it work for me! Hence the BED CURTAIN demonstration both to answer Wyrna's inquiry and also just in case (when I get old; like Tomorrow !) I forget how I did this! :D It always is a surprise to hear that what is as common as mud here is difficult to come by elsewhere. I don't think that the gel glue would be any different than a really heavy starch, But what I think MIGHT work just as well is a WALLPAPER PASTE that is thinned with water.
DeleteI would be more soluble and give the fabric some stiffness without the danger of any shiny spots or clumps! (Try it on some scrap cotton cloth first)
As for Mr. Scrooge..... Christmas is not Christmas without watching this movie version with Alastair Sim. No one will ever top the scene where he "Must STAND ON HIS HEAD"
Merry Christmas Jonquil!!! "In keeping with the situation!" :D
elizabeth
merci à c. Dickens :-) et à vous pour ce magnifique tutorial fort bien illustré
ReplyDeleteles rideaux sont splendides
Heehee! Yes, Thank you Charles Dickens! I know that is tis' a Little premature, but I am in the mood for Christmas! When watching the clip on You-tube, I was impressed by how much this 1951 movie resonates with me still. No real flashy special effects ( except maybe with the ghosts ) but an honest story well told. Anyway, Thank you Claude! A compliment from you is always Most welcomed and Greatly appreciated! :D
Deleteelizabeth
Thanks Elizabeth for the great Tutorial! Wel done!!!
ReplyDeleteHello Nono! I THANK YOU and Mr. Scrooge thanks you too!!!
Deleteelizabeth
Elizabeth, thanks for the detailed tutorial. Many times I have seen such beautiful curtains, reading make a verbal explanation of "how to do", but now I can see exactly how to do it! Cool! Necessarily use a textbook. But I do not have a rubber mat with grooves. Elizabeth, where you can buy a rug?
ReplyDeleteYou are Most Welcomed Ludmila! I am the type of person that is called a "Show Me" person. I can read instructions but they swim around inside my head confusing me so I need to see something solid before most things can make any sense. This tutorial is really simple to do and once you have done it once you will wonder why you EVER feared making the dreaded curtains! Janine at Minworks has done a tutorial demonstration of how she used pins to set her drapes and she lists the postings below in her comments. Stop by her blog, Ludmila, and check it out. If you have no gel glue handy then I would consider the WALLPAPER PASTE thinned with water as I mentioned to Jonquil, as a possible substitute.
DeleteBut what do you mean about buying a rug? I need a little more information okay? :))
elizabeth
I talked about the ribbed plate, which you call Pleaters. I do not know where you can buy a rubber plate or something to replace it.
DeleteOh I see! I bought mine over 20 years ago and I'm not sure from where? But I think that you may try Ebay or A miniature store that has an on-line catalogue of building supplies. I will investigate it some more and see what I can find out for you so stay tuned. :D Perhaps some others will be more helpful and can add some additional sources to try. Thanks for clarifying your question Ludmila, I appreciate it! :))
Deleteelizabeth
Thank you, Elizabeth!
DeleteHello Again Ludmila! This was an easy assignment after all! I found that the pleaters are formally called " d. Anne Ruff, Pretty Pleaters" and there are a number of on-line stores that carry them including a few in the U. K. which may be cheaper for postage than ordering from the U. S.. Simon's comment said that he found his on Ebay and that could also be a viable option especially dollar wise. I hope that this information will help Ludmila and I wish you many happy hours of curtain making! :D
Deleteelizabeth
Thank you for this tutorial! I need to get me one of those pleaters! And who would have thought to cook fabric in the microwave! What a smart idea!!
ReplyDeleteHi Veronique! You know I lost this Pleater in amongst all the clutter in my garage and never missed it! Now, after all these years, I am so glad that I have FINALLY found how to make good use of it! The microwave solution is just because I always want things FAST and the heat from the cooking process eliminates the tedious waiting. It is always best to build up the color in stages to get what you want. And make sure that there is enough stain to evenly cover the fabric other wise you will get spots like the 2 you can see on the blue toile shower curtain fabric. Spots and splotches are Not so pretty. Have fun!
Deleteelizabeth
Elizabeth, thank you so much for this wonderful tutorial. I love the toile fabric. I was also not aware of this inexpensive glue. I will have to purchase some soon. :) I have been searching for a fabric pleater & almost won a metal one on Ebay, but I was outbid :( The search continues...
ReplyDeleteLisa
Hi Lisa! You are Most Welcome and Thank you for your Lovely Compliment! I love toile fabrics and I have a nice collection of them to be used for future mini projects. There is an elegance as well as a casual atmosphere to these patterns which I Adore! I can never seem to get enough and I am always looking to add more to my toile fabric collection.
DeleteThis glue is very common and I have found mine at Wal-mart and it can be purchased at some dollar stores according to Marisa @ Steinworks and also try office supply stores like Staples or Office Depot as possible outlets. But as I told Jonquil, try thinning WALLPAPER PASTE with water. I can not see why this would not work just as well. It is water soluble and can be made into a slurry that could evenly saturate the cotton cloth. You may have to experiment a bit to get the mix correct but Why not give it a try!? As to the pleater, keep searching or try the pin method a la' Janine @ Minworks.
(see her comment below) There is always more than one way towards a goal.
:))
elizabeth
Hi Elizabeth,
ReplyDeleteThank you so much for this tutorial, I have always had my doubts about the pretty pleater because I thought the pleats might look unnatural.You bed curtains look amazing, so soft and natural, I will definitely give it a go.
ML Fi xx
Hi Fi! Nice to see you out and about once again! :)) I have always had difficulty with Pretty Pleater drapes because as you say they usually look unnatural. This tutorial proves that there is a way to get a good looking curtain with this often maligned and misunderstood Tool of Bad Repute! It seems the car was not the lemon, just the driver was! But Now,... there is Lemonade!!!!
Deleteelizabeth
Great tutorial, I would love to try this and now with your tutorial it does not seem that daunting. The drapes look amazing and very natural.
ReplyDeleteThanks again,
Jenn
Hi Jenn! I think that curtains are one of the most tricky things to do well in miniature. The fabric resists gravity and sticks out funny and /or can look like card board or tin soldiers in their rigidity. An entire illusion can be spoiled by un realistic curtains. I knew that there had to be a way to make the drapes look like they had physical weight so I did a few experiments with some smaller projects and it seemed to work. If you take a look at the bread bowl with the draped cloth over it at Minworks Blogspot, you will see one of the first little trails that I did using the gel glue and water to make the cloth drape over the dough. It is NOT daunting at all and once you see just how easy it is," YOU WILL NEVER BE AFRAID OF MAKING DRAPES AGAIN!! "
Delete( well, at least I would Hope not ) :D
elizabeth
Dear Elizabeth,
ReplyDeleteThanks for sharing. You did a great job and a clear instruction How to make curtains.
I love the fabric you used.
Hugs Dorien
Hi Dorien! Thank You so much! I wanted to make sure that I didn't leave anything out during this tutorial so a picture is worth a Thousand Words, but I find that I still tend to ramble on and on! I can never keep my replies on point! :/
DeleteBut I am so glad that you like the fabric Dorien because it is some of my favorite! Actually ANYTHING TOILE is okay by me! :D
elizabeth
I for one LOVE how your mind works! A gal with a tale in her head at all times is a gal of my kin'
ReplyDeleteThese are the most realistic looking, natural hung curtains I have seen. Its because they have a rounded pleat, fantastic!
Again Madam you dazzle us with tales and tutorials and a fantastic way of seeing things.
Love that mind ;)
la façon de choisir le titre du message est ... originale !
DeleteElizabeth, c'est un excellent tutoriel, le résultat est très naturel et très beau. Un grand merci !
Bonne soirée ! rosethé
Hi Jane! I am glad to have You as a comrade in arms, crazy lady! heeheeheh
DeleteI am delighted with the comment about them looking natural Jane, Most Welcomed! Curtains can make or beak the window, but having them so dominant in the room meant that I had to work on how to make them appear to look natural and like gravity was at work! I am satisfied with the results.
I will pass on to Mr. Dickens that you liked his tale. He always had a fantastic way of seeing things too! :D
elizabeth
Rosethe' ( huh? Between you and Jane,This reply got all switched around!? )
DeleteEven so,
It pleases me so much that you like the Introduction to this tutorial as much as you like the Tutorial itself! I love this movie version and what a great way to make me feel Christmassy all over! :D I hope that you will get an opportunity to give this a tryout, Rosethe' If it can work for me then 'Naturally,' I know that it can work for you too! :))
elizabeth
Dear Elizabeth, Thank you for the tutorial. I always learn something from you. I love the way you are brave enough to throw things in the microwave and just try different glues and paints etc that simply do not occur to my one-track type of mind.
ReplyDeleteI do not have a pretty pleater and I was too impatient to wait to borrow your pleater when I did the curtain under the kitchen sink: Kitchen Finished December 28 2012 and the curtains around the bed in the Empire Room: March 2012.
I used pencils or dowel to pin the fabric onto a block of styrofoam and then sprayed it with hairspray. There were hundreds of pins but once I removed the pins the pin holes were not visible. I did use fine dressmakers pins but most important I think, is to use 100 percent cotton fabric.
So fellow mini adventurers do not let the fact that you do not have a pretty pleater on hand discourage you from trying Elizabeths technique.
regards Janine
Hi Janine! Many Thanks for the alternate solution to not having a Pretty Pleater at hand. I think that mine was problably buried in the MINI STORAGE in the dark depths of the garage at the time when you needed to use it!? Your curtains turned out just as Great without it! I think that even using old knitting needles of various sizes may also work. ( hmmm.... the wheels are always turning ) I can't shut off my mind!!! :0h noooooo!!!!!!
DeleteElisabeth, thank you so much for this great tutorial. I will treasure it on my Pinterest Board with "tutorials I definitly want to try out in future" :-)
ReplyDeleteI'll be away from Blogspot for some time....hope to join you all again later ....
Hello Liduina! I just got home from work and I will miss you while you are away! :( but I am so happy to be able to visit with you right now! :) I am delighted that you have enjoyed this curtain/ drape tutorial and it thrills me that you are posting in onto your Pinterest Tutorials Board! WooHoo! THANK YOU! :D
Deleteelizabeth
Hello :) I just found your blog and have been going through it. I'm not going to bury you in comments so I just wanted to say what a great job on your wonderful house. I'll have something to do for the next few hours, going through previous posts :) And a wonderful tutorial for the curtains. When I get to the part of making a roombox for myself I will definitely have to try this method. Thank you for sharing!
ReplyDeleteRegards,
Jana
Hi Jana! Thank you so much for your compliment on the doll's house! I really enjoying working on it, and of course, showing it to all my friends! My ambition is to get it done enough to be able to decorate it for Christmas! Right now it is in perpetual ' Early Summer Mode', but I hope that if I can be constant in building the interior that I may just succeed with my goal for Christmas! :D Thank you for your encouraging words and I hope that you WILL try this out when your roombox is ready! :))
Deleteelizabeth
Hey Elizabeth
ReplyDeleteI am totally head over heals with your post, and simply can't get enough - I spent all day reading through it today whilst at work!
I love how you photograph everything and explain the ups and downs. It's silly but it helps to know others have a tough time with minis too. I know I'm guilty of it, but sometimes we over critique our own work so much, to the point where we won't even show some pictures!
I loved your tip about gel glue. I've been terrified of curtains till now - I promptly bought the glue AND the pleater this afternoon!!
Oh, and in fear of over using the word, I really "love" how you tell us your thought processes and reasons for doing things. It's truly made me re-assess my thoughts on how I view minis.
Thanks and keep up the great work.
Si
HoHoHo; A man of ACTION! I LOVE it!!! Thank you for taking the time to read the mile long backlog of old posts! I can't believe just how much I have written over the last 10 months! So that is a whole lot of work for you!!!! I am so happy that you found the gel school glue AND the Pleater so quickly and easily! Whoopeee!!!! But now would you be a 'dear' and let Ludmila know where you bought it? She is wanting one too! :D
DeleteNow as to my thought process, Simon, who can explain it? I am all over the road and full of fears too! Part of my love of blogging is that it helps me clarify what is bugging me about Me! Seeing it in print enables me to break the hesitations and procrastinations down to bite sized pieces and to also laugh at myself in the process. I think that I take things far too seriously at times and so writing things down, allows some better perspectives so that I can lighten up. Hey,... This is Therapy!!! :D But seriously, I know that it is often difficult to trust one's self, because we are constantly comparing ourselves to others. I am REALLY TRYING HARD NOT TO DO IT! I just want to be the best that I can be, doing my thing, in my style, the way that I like to do it. Hopefully others will enjoy it, but if they don't... Well at least I WILL! So trust your own judgement Simon, and like what you do at the time that you are doing it, otherwise it is not as much fun! And Miniatures ARE supposed to be FUN; am I right????? :D
elizabeth
Wise words indeed.
DeleteI got the gel glue from eBay UK, but there was also some that could be shipped from the US.
Good point about the therapy, I have it all going on in my head, too much going on at times, and my mini projects are an outlet for all that. Sometimes visible through the truncated flow and process!
As for the Man of Action - I'm more a cup of tea and slice of battenburg man myself
;-)
I enjoy a good cup of tea myself and always have a pot brewing on the the warmer. This outrages some who would consider it sacrilegious towards the tea but I'm not so much of a connoisseur as much as I am tea addict and when I want it, it MUST BE READY! :))
DeleteOk Elizabeth,
ReplyDeleteBecause of your fantastic tutorial and outcome...I just might stop seething every time I look at my THREE pretty pleaters in different sizes. I have not be able to get a decent curtain out of them yet and I know it is me not the pleaters. LOL That part about lifting the hem was really smart. We all know that curtains flow at the bottom so why don't we make them that way? shruggin'.
Me thinks I may have made mistakes by using spray starch instead of the glue. It could also have been the fabric I used. Can you tell what I can do to keep the last couple of pleats from coming out when I move the last "ruler" to the front? Also, when I put in the next one the last one slips out of the groove...oh so frustrating!
Heeeheeeheee! Grandmommy you have exspressed what so many of us have felt about the Notorious Pretty Pleater. Prior to working out how to use it, I just ignored it and/or bypassed it entirely. It was out in the garage during my long sabbatical from minis and then when I DID find it, it sat inside a drawer for months doing nothing but taking up space. It then came the time to turn and face the Beast and try to make it my friend! I have used both heavy spray starch and hairspray Extra Hold and neither one works as well as the gel glue. PERIOD. If the fabric is a cotton blend then it Will fight you back, but I tried this out on a synthetic blend and ended up taping it into the drape of folds with the aid of masking tape and just letting it air dry. I kept wanting to "fly up", but eventually it did stay put. So try to use 100% cotton if at all possible. Make sure that your 'anchor' that is holding the pleats in place is long enough to run the entire length of the fabric. I use to use a small card and everytime I went to push down another row the first row would pop back out from the top. Grrrr
DeleteIf your ' anchor stick' is as long as your cloth this is less likely to occur. But remember that you don't have or Want to fill Every groove, as you will be lifting them out while you are blow-drying the drapes, adjusting them as they dry, so go with the flow. But I did find that the damp and gluey fabric will actually hold in place very well and I had very little problem getting the last row inserted. I hope that this information has proved helpful Grandmommy and that the next time you need to make drapes there will be a Big Smile where the seething use to be!:D
elizabeth
I did not know this glue gel, I'm not sure to find it in France. but as I have the chance to go to Philadelphia in three weeks, I'll get in all stores, hihi! this is a very good idea. I will try your technique one day. thank you
ReplyDeleteHi Catherine! How wonderful that you will be doing a bit of continental travel in the near future! Is it for the Philadelphia Miniature show by any chance?
DeleteI am sure that you will be able to find the gel glue here, if not in France, but make sure it is carried in your luggage and not in your purse for airport security reasons. Imagine the frustration if it was confiscated after flying all the way across the Atlantic to take it back and it never gets a chance to leave the U. S. A !!! ><
Meanwhile, if the gel glue is unavailable to you I would try the Wallpaper paste mixed with some water to get a slurry. I cannot see why that would not work just as well! :))
elizabeth
Elizabeth
ReplyDeleteI saw that glue at the dollar store and I passed it up because I thought school glue would work better until I saw your tutorial..well color me impressed!! Im also thinking about getting a pretty pleater too (I feel like the little red head step child because everyone has one but me..well not really but you know how my mind works)
so thank you very much for this wonderful turtorial :)
Hugs
Marisa :)
Hi Marisa! Everyone may have one but not everyone has liked using them! I am so pleased that you are wanting to tackle the drapes Marisa! Hoooray!!! You know,earlier I said that I had tried this gel glue and water on some smaller items and one of the projects was the "ratty old bathrobe" that you had mentioned that you would be wearing whilst trying to wrestle Nate the Great Dane to retrieve the slipper that he had confiscated. I don't know if you recall that comment of yours but it tickled me and so I have been experimenting with the Ratty bathrobe idea and trying to perfect it. I've made one but I think I shall try again to make it better, now that I know what I want! Thank you for the inspiration Marisa! I always enjoy your honest comments and your great sense of Fun! :))
Deleteelizabeth
Fantastic tutorial, Elizabeth. It was both informative and entertaining. Your new shower curtain looks fantastic, you trickster! ;-) xo Jennifer
ReplyDeleteHI there Jennifer! I am so happy that you Enjoyed this tutorial! I try to do my best to make it interesting and if you happen to be reading it and suddenly it changes right before your eyes, it is only me Editing over and over again trying to make it easier to understand. Last night I found that I could change the color of the font and so I began to play with the text and who ever was reading saw nearly every color of the rainbow flashed in and then out for a good 15 minutes! hahaha
DeleteImagine! Ten months of blogging and I didn't know that I could add color to the posts!!! And now that I have found it, I intend to use it more often... Look Out!
I see that you liked the ending Jennifer!? Yes I was being a ( little) tricky but what a great segue;... hmmmm? :D
to be continued...
elizabeth
First I'll have quick peek in all pleats of the bedcurtains, just in case there will be a (CHristmas) ghost in it.....;)! Dear Elizabeth, I love the way you write your posts, even like it is the way (you say) you're tend to ramble, it makes you unique and so very "Elizabeth" :D!!
ReplyDeleteRegarding your tutorial: I always use very thin real cotton, that works the best for me. I also don't like stiff pleats, so I use pins for pricking the wet fabric on foam board. I often use hair gelspray, it stiffens the fabric whilst drying with a hair dryer. But I won't drying the fabric for too long, because I want there will be left irregular pleats in the curtains, just like you did. Thanks for sharing this great tutorial to all of us.
Did I told you that your shower curtain is a fantastic idea? It look wonderful!
I am not yet in the Christmas mood, but the colors I currently am working with, are related with......can you guess what am I doing ;)!?
Big hug, Ilona
PS Can it be that Ludmila has intended the pretty pleater, if she says rug?
Hi Ilona! Your safe! No ghosts in these Bed curtains!!! heehee! Your way of pleating is the same way that Janine has described and I say "if it ain't broke, don't fix it!" Keep doing what works best for YOU! I guess this tutorial was based on already having the pleater and never being satisfied with the results! But now I know just how to make it work for me and I hope that I have shown others how they can make it work for them too! I have seen and drooled over your dressmaking and needle work skills Ilona and so I know that your drapes could never be anything but OUTSTANDING! I admire you and what you do so much and I feel so blessed that you leave me such encouraging comments and compliments, Thank You! I am glad that you like the Shower Curtain and I hope that the rest of the bathroom will get finished before to much longer.
DeleteYou were right Ludmila WAS asking about the Pleater and I will try to find out some more about it for her.
If you are making something special I will be right over to see what it will is! There is no surprise but that it will be only The Best! :D
elizabeth
Hi Elizabeth, I am so going to use your tutorial to make pleaded curtains for "La Vie en Rose" and give you all the credit ofcourse ;0
ReplyDeleteHug AM
Hi AM! This is music to my ears! That is what a tutorial is all about! I am so impressed with your building project and the title of it " La Vie en Rose" means that it will be Romantic and French, two things that go together like Chanel and No. 5! I look forward to seeing how it all comes together for you AM! Thanks in advance for the kudos! :D
DeleteEnjoy!
elizabeth
Como siempre tus entradas son geniales , gracias por compartir tus experiencias.
ReplyDeleteUn tutorial fantástico :-)
Hello Rosa Maria! It is with great pleasure that I see that you are here! I am so happy that you have enjoyed this tutorial and my experiences in making the drapes. I always want it to not just Look like it could be fun, but for it to really BE fun! and I hope that you will find an opportunity to give it a try! Thank You again for your comment and compliment Rosa Maria! :D
Deleteelizabeth
Hi Elizabeth,
ReplyDeleteThank you for this! Now I know what to buy Sam for Christmas. (If I get a pleater, she might be inspired to make some curtains!)
Hugs
Isabelle
Hi Isabelle! I think that a pleater is a Great Investment especially for you in your line of work! As a Property Manager, you could stage the homes that you show your clients and get top dollar for them. Presentation is such a Plus! Mind you the Wonderful properties that you have had ; and that you've most recently, sold, have a whole loft of personality wiithin even without any curtains! :))
Deleteelizabeth
Estupendo y entretenido tutorial. La cortinas quedan realmente bien.
ReplyDeleteHi Isabel! Thank You! I try to make each post 'Interesting and Entertaining' so your comment and your compliment Really Pleases Me! :) As a tutorial the goal is to present it so that others will read it through to the end and then to consider making the product. So I feel obligated to make each tutorial as clear as possible and both Doable and Fun! I hope that you feel that I have done both! :))
Deleteelizabeth
Ah, Elizabeth! You are Brilliant!!! (I LOVE the Scrooge references....) And your SHOWER Curtain is Fabulous!!! You really snuck that one right by me!!! These tips and techniques are great! If I might ask... how do you handle cloth that you might not want to have entirely wet? Like silk or brocade? Your curtains do have a beautiful
ReplyDeletehang" to them... as well as being of a lovely fabric! I am such a slow poke about curtains... All I have is lace pinned up to a couple of windows.... and the curtains in my Lovely Old Dollhouse Livingroom are carefully stitched silk panels... but they don't drape at all the way I wish they would! As usual... you are an inspiration!!!
Hi Betsy! I am Thrilled that you are Thrilled with this tutorial!!!! :D I often am on pins and needles when I first publish a post and think " Oh dear, it's not good enough and No one will like it!." Seriously.. I have to remind myself that this is a hobby and not the 'Pulitzer' or the " Nobel Peace Prize" :D But I am glad all the same that so many people including YOU have not only enjoyed it but have taken the time to tell me so! So once again Betsy Dear, THANK YOU!!!
DeleteNow as to your other question about the silk and the brocade, I can only suggest that you experiment on a little swatch because I know very little about their reaction to glue and water but I know that the shrinkage and/or wrinkling would NOT be a good look!! :( I can only endorse the 100% cottons that I have used. But hey, you are a Pioneer of New Techniques so you could have a go and then let us know!? :)) I love the name of your 'LOVELY OLD DOLLHOUSE" it conjures up images of a faded beauty sitting in a meadow of wildflowers and grown over with old-fashioned roses! ahhhhhh......
elizabeth
Привет Элизабет!
ReplyDeleteВы придумали замечательное название для своего сообщения!:):):) Да и работу вы сделали очень тщательную и трудоемкую! Как Каролина однажды мне сказала: Вы можете погладить себя по спине!:):):) Мне очень нравятся ниспадающие складки на вашей шторе. Я помню очень давно моя мама пошила мне плиссированную юбку. Знаете чем она пропитала складки? Сильным раствором сахара!!! У меня была сладкая юбка! Складки были великолепные!
Мне было очень интересно читать ваш пост.
И меня порадовала ваша последняя фотография! Она вкусная изюминка!
Татьяна
Hello my dear Tatiana! THANK YOU for your Most Welcomed words and also for reminding me about the Sugar Starch! My mother-in-law also knew about that method and I believe that she told me that the pleats, as you've mentioned, were very crisp and long-lasting! Perhaps that could be translated into a miniature use too. I don't know about you Tatiana, but it seems that Everything that I see lying on the ground or on the hardware store or grocery shelves gets the once over as to how could this be used for Miniatures!? I don't know if you got an opportunity to read VERONIQUE'S blog posting from "The House of the Ancestors" where she talks about her need for a kitchen
Deletesink and her trip to McDonalds restaurant? Soooo Funny and yet soooo true!
We are always looking for solutions to our mini "problems" from every conceivable source! Your suggestion of the Sugar Starch alternative may be just the ticket! :D
elizabeth
Дорогая Элизабет!
DeleteСпасибо за ссылку. Я действительно получила удовольствие, когда прочитала пост Вероники. У меня малогабаритная квартира. Поэтому вся история прожив в доме на 10 лет больше, чем надо, уходит на мусор. Если бы у меня был большой дом, то в нем действительно было бы возможно найти бивни мамонта. Потому что по натуре я как мышка, тащу все в дом!
Hi again Tatiana! You are a "dragger" too!?haahhah I swear that I am squeezed in so tight here at the table that I type on and have only enough room to contain my computer and the arms that I type with, because the rest of the table is over-loaded with tiers and tiers of pens, papers, books, glues, lamps and other necessary paraphernalia etc. If I work on anything I can only get clear a 10 inch area because there are piles of stuff that I have dragged in and stored on every other available surface! The interesting thing is that I work well this way, nearly swallowed whole in the midst of it all. How about you and the stuff that you collect; are you buried alive too?
Deletee
ХА-ха-ха! Увы, это так! Я иногда заставляю себя убирать вещи со стола! Недавно сделала ценное приобретение!!! Купила 6 комодов. В каждом комоде 5 ящиков!!!! 30 ящиков нового пространства!!! Хотя нет уверенности, что на столе освободится от вещей !:):):)
DeleteТатьяна
Thanks for the great tutorial! I did not know you could "cook" fabric like that in the microwave =)
ReplyDeleteHannah
Hi Hannah! THANK YOU! It is funny that this was also mentioned before about cooking the fabric in the microwave! When I initially was wanting to stain the very light ground color of the toile to something more of a muted tan, I used a wet cloth in a cold bath and the stain washed away with the rinse. So then I thought about how if I were to dye cloth in REAL LiFE what would I need to do.... The packages of dye usually recommend that you melt the powder in a solution of HOT water first. So because the coffee was cold I heated it up and then put the cloth in but then I thought "Why not just put the cloth in with it?" It worked faster doing it this way and the stain did NOT wash away with the rinse. Depending on what you use, this process can be repeated over and over to build up the stain to the color that you desire. Just make sure that the dish that it is in is Microwave Safe of course! I find that there are many different ways of 'solving problems' and as Lea' and I once discussed, " For every problem there is a solution and if there is a solution then there is no problem", (she will kill me for bringing this up again so don't tell her I said it, heehee ):))
Deleteelizabeth
yes, I'm going to the show of miniature. I have a lot of luck.
ReplyDeleteI'll put in my suitcase at least two tubes of glue! hihi! Products for artists are cheaper in the USA. I always come back with a suitcase full of brushes .. made in France or made in China! haha!
Hi Catherine! You are one Lucky Bug! That show is Very Big and Very Famous and I am Very Green with mini envy! You will have a Fabulous time attending!
ReplyDeleteIn my Real Life, I sell fragrances for the House of Chanel and I once had a client that came to buy 4-5 bottles of Chanel to take back with her to France! Why, I asked would she want to buy it HERE rather than THERE,( where it is made ), she replied that it was a Lot Cheaper in North America than it was in Europe and Significantly so; enough to make it worth her while. Your comment about the French brushes making a return trip to France reminded me of that instance. hah!
I hope that you have a Marvelous time I and look forward to seeing all the mini treasures that you will bring home with you to show on NINETTE AND CO. and hopefully the gel glue will also be among them! :D
elizabeth
Well...I finally came up for air from working on my website for the last few days and looked to see what my dear friend Elizabeth has been up to and sure enough....what a wonderful Tutorial. You have done such a great job, I may even try a curtain even though I'm not even at that stage of building. Thank you...now back to work.
ReplyDeleteHey Fats! I am so excited to hear that you are finally back to work on your Web Page! I can hardly wait, and I am sure that everyone who has had the opportunity to see all the many talents that you have in making minis will agree with me in saying, "When, when when?????" :D
Deleteelizabeth
¡Hola Elizabeth!
ReplyDelete¡Muchas gracias por el tutorial! Explicado así parece sencillo, supongo que también habrá que tener un poco de talento para conseguir ese resultado tan realista.
¡Un abrazo enorme desde Sevilla!
Hello and THANK YOU for the compliment and for your comment Pedrete! It really IS simple but I think that the more one practices a technique the better one gets at it. Wouldn't you agree? For a beginner, the results might not be exactly as anticipated the first time, but that is true for anything that is unfamiliar but once you have done it once and seen that it is not so scary as you at first thought, then it builds your confidence to try it again and maybe do something just a little different to make it your own! And then before you know it...... TA DA!...... A new Tutorial is Born! :D
Deleteelizabeth
Thanks for the tutorial!
ReplyDeleteGeneviève
Hello Genevieve! Nice to see you, and You are SO Welcome!!! :))
ReplyDeleteelozabeth
errr, hmm,... I mean, elizabeth!
DeleteI just love coffee as a natural dye! It also makes the studio smell really wonderful. :) Great idea with the white glue for pleats... I will have to do this when I get to the curtain stage in my mini decorating! :)
ReplyDeleteHi Lindsey! Thank you for your comment and the compliment about the pleats! I hope that you will give this a try when the time is right! I have had a peek at your mini bulletin board and fireplace just now and what a great project it has turned out to be! Way to go!:D
ReplyDeleteelizabeth
This is such an excellent tutorial. I have never used glue for this. And I pin my fabric in place. But your method won't leave pin holes. I love that. Thanks so much for sharing this.
ReplyDeletehugs♥,
Caroline
Hi Caroline! I am delighted that you have enjoyed this tutorial! It has made many new friends since I published it! hahahah Not only will this method NOT leave pin holes, but the drapes hold their shape And appear to fall 'naturally' too! I hope that you will give this a try sometime, that would please me to no end! Thanks so much for both your compliment and for your comment Caroline, and have fun!
Deleteelizabeth
Thank you very very much for the detailed tutorial. You have always cleaver ideas and you are so kind to share them with us.
ReplyDeleteI had never seen the pretty pleater before and I'm not sure I can buy it here in Italy. For what is it usually used for?
Thank you again. Soon I will try at least the glue trick.
Hello Ersilia! Thank you so much for the comment and the wonderful compliment about this tutorial! I Always enjoy hearing from you! To answer your question about the pleater, it was actually made back in the 80's ( if I remember correctly), specifically for making miniature drapes and curtains. The official name of it is " d.Anne Ruff, Pretty Pleat 1". There is a web site for it under this name, and as well, if you Google it, you can find vendors that will ship. There are several sizes of this pleater and to work in various scales but for the 1/12th scale I have used the Pretty Pleat 1 because it has the length and the correct width of grooves to make the panels I needed. For tighter pleats the half scale mat is also good. I am glad that you will give the gel glue trick a try. I find it a very inexpensive and yet very effective way of getting the drapery to hold its shape without sacrificing the natural visual softness of the fabric. I wish you Great success and most of all Lots of FUN! :D
Deleteelizabeth
Great tutorial Elizabeth, the curtains look fantastic! :)
ReplyDeleteHey Sarah! I Thank You kindly and hope that this tutorial will be of some benefit to you, somewhere down the line. It's funny that for years and years, I never liked using The Pretty Pleat and NOW it is my new BFF! ( this is the first time I've used that abbreviation, and never thought that I would say it about a pleater. hah! :))
ReplyDeleteI need to get out more often.:(
elizabeth
I ruled out the pretty pleater because I didn't think it looked very natural, too even, but I like how you have used it Elizabeth and it looks like fun to do, you can still be a bit creative with it. I MUST make at least a roombox to play with!
ReplyDeleteHi Margaret! I agree! That has always been the thing that has bugged me too!
DeleteThe pleats ARE too even and Always look too formal when they are hung. What ever kind of window there was, the drapes always looked rigid. I felt that perhaps it was not the mat but Me and that I had to approach it differently and so this is the result. Now I will try to make use of it at every opportunity and I hope that you and those who have tucked it away, as I did, will give it a Second Chance because it IS Lots of Fun! :D
elizabeth
Nice stuff dear Door and window curtains & double bed sheet set
ReplyDeleteThank You Preeti! I saw on your webpage that you sell full-sized drapes and curtains so it must have come as a surprise when you saw me wringing glue and water out of mine and discovered that they were small; but I Thank You for Very Much for your compliment! :D
ReplyDeleteelizabeth
That's some pretty good work there! I'd also love to make myself custom curtains that would go well with the brand new kitchen I got from kitchen design aberdeen team.
ReplyDeleteKeep it up!